DIY home automation foundation
Getting a stable DIY home automation system up and running is not for the faint-hearted. Deciding which hardware, software and protocols you want to use for your project can be a challenging task because of the overwhelming choice.
In this article I’ll explain my personal view on DIY home automation from a developer stand point. I’ll try to keep it as generic as possible so that regardless of the hardware or software you use, you’ll be able to pick up some of my ideas and improve your own implementation.
Quality assurance
It’s awesome to read so much articles and ideas on the web these days regarding home automation and IoT, the sad part is that most of the time these implementations are OK as DIY gimmick. But to use it everyday as a “production” kind of environment is an whole other story. Topics that are often ignored in these DIY projects are:
- Security
- Reliability
- Safety
- Extendability
You can prevent all sorts of annoying situations if you think about the topics above before starting. Ask yourself questions like:
- What happens in case of a power failure and will the system be able to recover?
- Is this sonoff that I’ve stuck behind the couch safe for my child?
- Will my garden sensors be able to withstand a week of pouring rain?
- Can I add extra sensors to my system and is there a limit?
You should keep in mind that everything will soon or later break. And when it does, it will probably be at the most inconvenient time and when you least expect it. Let’s hope you are lucky and be at home at that moment, because otherwise you can expect a raging call from your wife. Trust me, I’ve been in this situation.
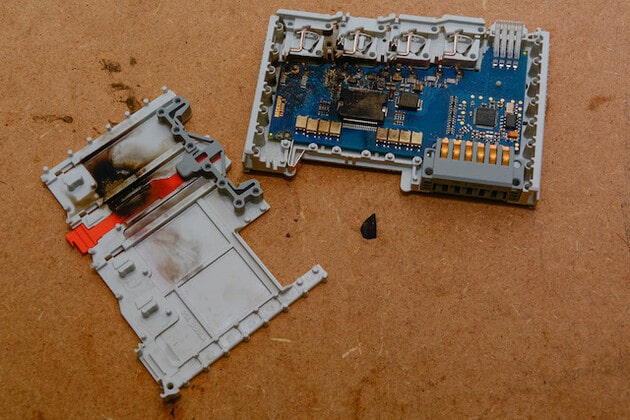
So please do design for failure and save yourself a headache.
Industrial grade core
The core of a home automation system is for me the basic electric functionality needed in a house. At this stage you should forget about the automation bells and whistles for a minute and focus on the basic functionality of wall switches and lights. What I mean by this is focus on the functionality you’ll find in a everyday house these days. Pressing button X will turn on light Y. Pressing button A will close shutter B.
This part of the system is the core and should in my personal opinion be really secure, reliable, safe and extendible. So for me personally, boards like Arduino, RaspberryPi’s and other DIY boards are a no go in this part of your system. Don’t get me wrong, I’m a huge fan of these platforms but there are just to many things that need to get patched before these systems will meet the above listed requirements.
To give you an idea of some of the hurdles you’ll run into when using DIY boards in your core system:
- Corrupt Raspberry Pi SD card in case of power failures
- Arduino and Raspberry Pi lack of GPIOs (you need at least 100+ for a complete house)
- Extra circuits needed for proper electric (relay) isolation
- Debouncing inputs will have to be handled in your code
- GPIO (5v) relay (24v) voltage level conversion
I’m not saying it’s impossible to run an entire home on Raspberry Pi’s and Arduino’s, for example Jonathan Oxer from SuperHouse.tv is doing exactly that, but it’s harder than the hello world home automation articles you’ll find on the web these days.
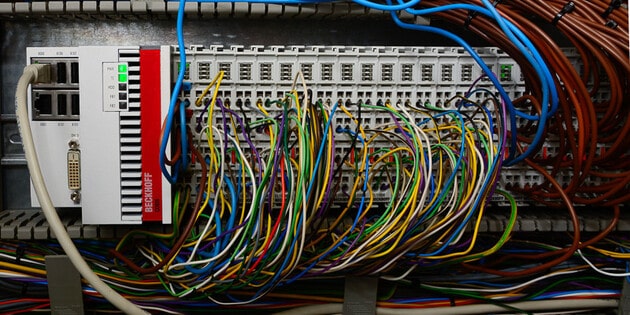
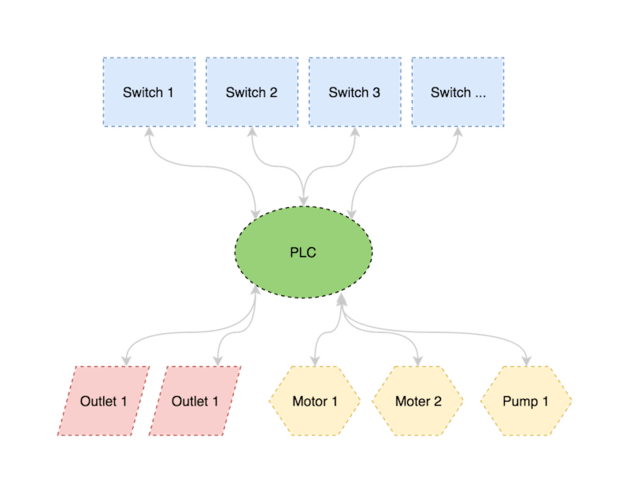
For me the right component here is something industrial grade with proven reliability and safety at it’s core. A programmable logic controller (PLC) matches all these criteria. I personally choose to use a PLC of the brand Beckhoff but any basic to mid range PLC will probably suffice.
The only requirement when choosing a PLC is that it has an Ethernet connection and that there is a way (API/protocol) to control your PLC program remotely. This part is essential to be able to later on add the automation part of our setup.

Keep in mind that these industrial grade devices are in another price range than your average DIY controller. But personally I think the reliability you’ll get from these devices justifies the one time cost.
Another advantage of investing in a industrial grade device is that it’s a piece of common knowledge. Every electrician with knowledge of PLC’s will be able to fix your installation if you’re not available or end up dead. Imagine the same thing happing if your home automation is build up out of custom compiled bits and pieces, all deployed on a pile of DIY boards that are shattered around the house. There will be no electrician that would even dare to touch it.
You should think about the bus factor of your installation. If the core of your system has a bus factor of 1 your are probably doing something wrong. In case of my PLC implementation that is fixable by anyone with some Beckhoff knowledge, you are probably looking at a bus factor of 1000+.
Topology
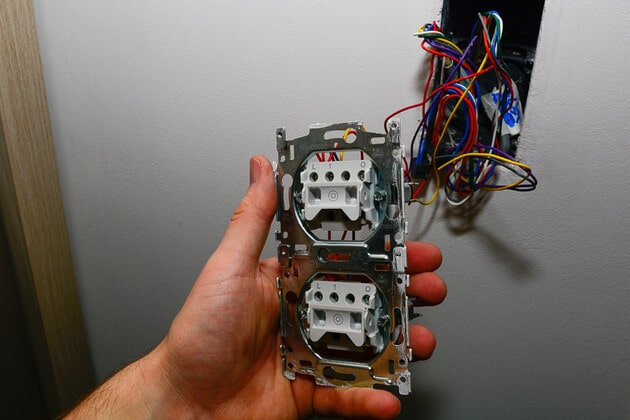
To use a PLC it’s best to run all your wires (buttons, outlets, shutters) to one central place in the house where you can connect them directly to your PLC. So you create a star network of all your basic IO devices in the house.
Like I said before, reliability is key for me and wireless is the opposite of reliable if you ask me. The only disadvantage of using a star setup is that you’ll end up with a gigantic amount of wires at your central location. Do make sure to provide enough room for all these cables and buy a large electrical box to make your life easier.
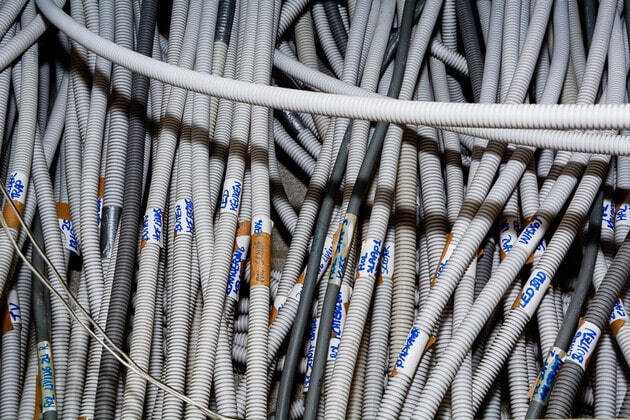
Take your time to label all these cables with some quality labels. I’ve made the mistake of using some cheap tape as labels which came loose after a while resulting in some unlabeled cables. I’m sure Sherlock Holmes would appreciate such a quest but I prefer to spend my time on more exciting projects.
To solve this I highly recommend to invest in a good label printer. If you are working with such amount of cables you’ll need to start labeling everything.
Because all the cables to your switches are low voltage (24v) there is no need to use main electrical cables. For my installation I’ve choose to use SVV signaling cable with 8 or 16 wires. With this amount of wires you will be sure you’ll not have to pull in extra wires if you want to make some changes to your installation. For example replacing a 2 button wall switch with 4 buttons can be done without a problem.
Adding layers
If we want to add layers to the core there needs to be a sort of API to control the core layer. In my case, because I use a Beckhoff PLC this API is ADS which is a protocol to update and read states of variables in your PLC program.
There are C libraries available to interact with ADS but this is not really usable. I wanted my API to be easily usable in all sorts of programming languages. So I made the decision to create a REST API in NodeJS that mapped incoming requests to ADS.
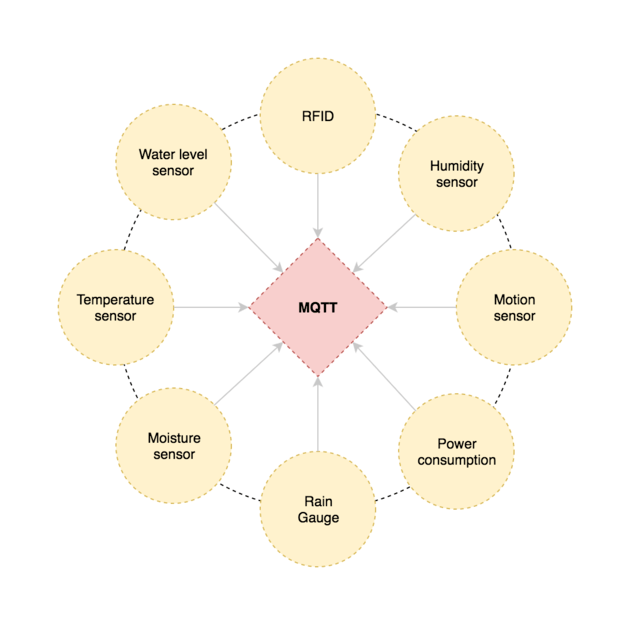
Another feature that I’ve added to this project was an ADS event listener. I listen for changes on all inputs and outputs of the PLC and when a change is received I publish it to MQTT.
If you don’t know what MQTT is, make sure to look it up because in my opinion it’s an essential piece of the puzzle if you want to roll out your own home automation system. In short: MQTT is a server that you can connect to and publish events to, or listen for events on. One big advantages of MQTT is that it’s very light weight and that there are libraries available for every language and platform that you can think of.
To give you a use case: you can create an Arduino that controls a water valve to water the garden by just writing a small program that connects to the MQTT broker and listen for a wall switch event (e.g. ` home/firstfloor/button/kitchen/2/on`). When this event is received the valve is opened. So without touching or changing your core system you’ve added a way to control your garden watering system from a wall switch in the kitchen.
Sensor layer
Like described in previous part I prefer to publish all my events to MQTT. This way this information is available for every other device on the network that is interested.
No matter what kind of sensors you use. Most of them will have a solution to publish the data to an MQTT broker.
If you are looking for a cheap solution to build a wide range of sensors make sure to check out MySensors. MySensors is an open source project that provides you with all sorts of sketches for your Arduino to build a gateway/client network. The cool thing is that the communication between the clients(sensors) and the gateway is done using cheap radio modules like this NRF24L01+. These ultra low power radio modules make it possible to run your sensors on a pair of AA batteries for over a year.
Network event layer
Something else that turned out very useful for my setup was setting up a central (r)syslog server. All devices on your network should send their logs to this central server which obviously is useful for debugging purposes but it will give you another layer of events.
Using rsyslog conditions you can listen for certain syslog events and publish an event on your MQTT broker.
To give you some practical examples of use cases:
- DHCP leases for specific IP address to detect if certain users are home or not
- Detect webcam FTP upload to use webcam as a motion detector
- Alarm when unkown mac address activity is detect on the network
- Alarm on critical device errors
My rsyslog config to publish events looks like this:
 # Load needed modules
module(load="omprog")

# Listen for foscam FTP upload
if $msg contains "[foscam] OK LOGIN" then {
	action(type="omprog" binary="/usr/bin/mosquitto_pub -h localhost -m motion -t 'home/firstfloor/camera/frontdoor/motion'")
}

# Detect if user is at home
if $msg contains "DHCPREQUEST for 192.168.1.130" then {
	action(type="omprog" binary="/usr/bin/mosquitto_pub -h localhost -m dhcp-request -t 'home/person/wim/phone/detect'")
}
Just take a look at the log files of the different devices on your network and you’ll probably can think of 10 other use cases.
Automation layer
So now that we have our core system setup and an event bus that’s signaling button states, light states, sensor data and network events it’s time to glue all this together with an automation layer. There are a lot of open source projects available for this purpose:
I started using OpenHAB and didn’t really look back. OpenHAB was doing what I expected and more. Also the integration’s with other commercial IoT home appliances like Phillips Hue and Sonos work great.
The sky is the limit
Thanks to a solid core system and a MQTT broker that publishes all events and data to devices that are interested you’ll end up with a very good foundation to roll out your own home automation system.
Now it’s just a matter of letting your imagination go and use the data available on the broker to make your home smart.
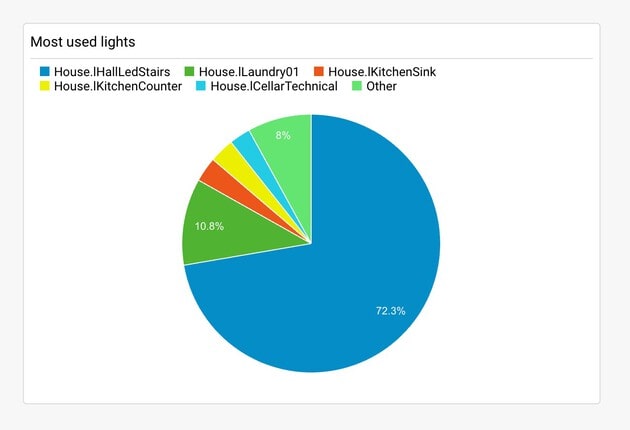
Just to give you an example of a service that I’ve added to my network and to show you how flexible this system is. If you’re a web developer you probably heard of Google Analytics. This is an online platform to track and report your website traffic. Because Google Analytics also makes it possible to track clicks on website buttons and other events, wouldn’t it be cool to push our MQTT events into Google Analytics? So I’ve written a little MQTT listener in NodeJS and pushed all my light and button states to Google Analytics. The result is that I’ve now have a reporting system for my house. Below for example is a pie chart of the most used lights in my house. It’s funny to see that the some of the most used lights in my house are actually the ones that I don’t have replaced with LEDs yet.
That’s it for now. I know this articles doesn’t go into too much detail on the technical side. If you want more information or have questions about one of these topics, feel free to comment below or shoot me an email.
Tip Jar
If you like this blog, leave a tip! Your tip will help provide the basic necessities which sustain this blog: coffee, beer and raincoats for surviving the pitiful Belgium climate.
Buy me a coffeeAbout Wim Mostmans
Freelance full stack developer and Co-founder of the Employee Advocacy platform Ambassify, with a general interest for web technologies, electronics, AI projects, and home automation.
![]()
![]()
![]()
![]()
![]()