Photo workflow using Lightroom and Dropbox

I’ve been interested in photography for over 5 years now, but during all these years I’ve been struggling to find a good photo management workflow. After each joyful day of photographing the same question struck me over and over again: How do I manage my photos.
Being frustrated about the fact that I, again, lost some photos I decided it was time to invest in finding a solution. In this post you can read a complete overview of my photo workflow.
Requirements
The requirements for a photo management workflow will differ for each photographer. For me personally the following requirements were essential.
- Backup photos
- Simple structure and easy to order in Finder
- Easy to load new photos inside Lightroom
- Share photos with family and friends
DropBox folder structure
I store all my photos on Dropbox (more on the advantages of this later). I have one main photos folder called Photos which will contain all my photos. There are two important sub folders. One to store my original RAW photos and another one to store my edited photos.
So the structure of this will look something like this:
Photos
   |-- Original
         |-- 201607 - Paris city trip
         |-- 201607 - Antwerp Zoo
         |-- 201608 - Family in the park
   |-- Albums
         |-- 201607 - Paris city trip
         |-- 201607 - Antwerp zoo
         |-- 201608 - Family in the park
The numeric part of the folder name is the year and month of that photo session. This way I get a chronological ordered list of all my photo sessions when I view this in Finder. The folders under Album are automatically generated by my Lightroom custom publish preset.
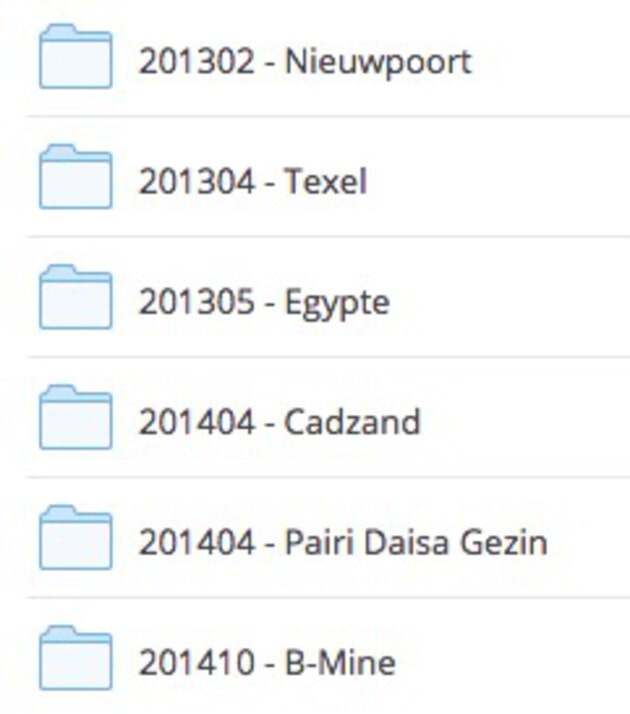
I don’t include the day in the folder name because for my use case this was a bit overkill. If you take a lot of pictures per month it’s probably a good idea to include the day in the folder name to.
The date in the folder name will also solve the problem of having duplicate folder names. For example if you visit the same place twice it will be clear that these were separate session.
The cool thing about using Dropbox is that you get backups of your files without having to worry about it and you always have it with you (if you have internet connection).
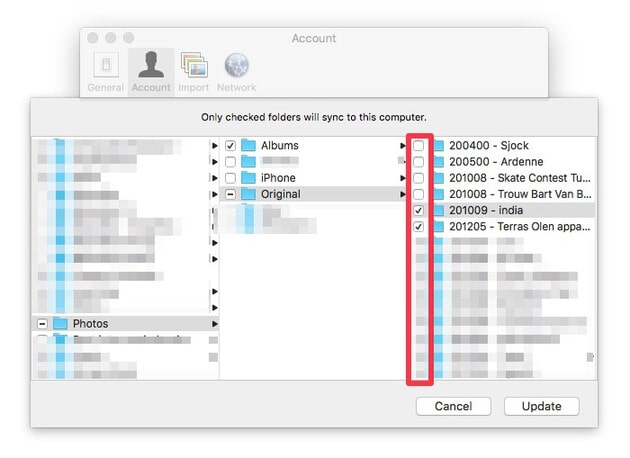
Also if your laptop has a small hard drive you can save space by disabling Dropbox from syncing albums that you are not actively using.
The Original folder will only contain our original RAW files. So no edited or modified photos will be stored in these folders. For this reason it’s impossible to use this workflow with a free Dropbox account, at least not for long. RAW files are rather large (around 30MB in my case) so a 2GB free account will fill up quickly with such a large files. But make the comparison of paying for a Dropbox account vs buying portable hard drives. I don’t think the price difference will be that big. Especially if you take into account the extra features like shared folders that you get with Dropbox. I happily spend a few extra dollars if it will save me time.
Taking pictures and importing them
Now that I have the folder structure ready I can start importing my photos. When I’ve been out taking pictures I will always try to do a first quick clean up of my photos. Most of the time I will have some useless pictures that were taken as a test or just plain bad pictures. I remove these because it’s a waste of space to have these on your Dropbox.
After this initial quick clean up I move the files over to a dedicated folder for that session like described in the previous section. For example Photos/Original/201608 - City trip Paris.
Lightroom
In Lightroom I’ve added the Photos/Original folder to my catalog. Each time I’ve snapped some new pictures I sync this Photo/Original again to load the new photos into my Lightroom catalog.
Like mentioned before I use the Dropbox selective sync to remove photos from my hard drive that I’m not actively using. Keep in mind that when you do a sync in Lightroom that you disable the option to Remove missing photos from catalog. This way non synced dropbox albums will not get removed from your catalog.
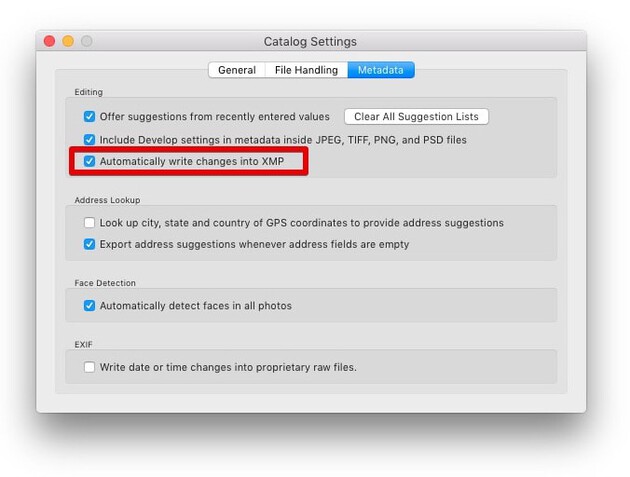
I’ve also configured my Lightroom so that file edits are stored in a separate XMP file. So if you would change for example the white balance of a photo, Lightroom will create a new file next to the original RAW file, with the same name and xmp as extension. I personally like the fact that my changes are stored in a separate file and that the original RAW file stays untouched. To enable this settings go in Lightroom to File > Catalog Settings … > Metadata and there you can enable Automatically write changes into XMP.
Publish photos
In Lightroom I use a custom publish preset that will export the selected files with as name YYYYMM - [Album name]-[Photo name].jpg. This preset also uses a post-processing script that will run after the publish finished. This script will then move each file to the corresponding album folder in Photo/Albums on my Dropbox.
A Lightroom post-processing script is a bash script that will be called after Lightroom published the selected files to a folder. Lightroom will then execute the script and attaches all exported file paths as arguments.
Below is the script I’ve written to move the files to their corresponding photo album on my Dropbox folder.
# Script that can be used a post-processing script in lightroom export dialog
# It will auto move all file to your dropbox and use specific parts of the
# filename to create sub folders

# Example: 201009 - India-DSC_3493.jpg
# will be moved to the EXPORT_ROOT/2010 - India/DSC_3493.jpg

DROPBOX_ROOT=$(cat ~/.dropbox/info.json | python -c 'import sys, json; print json.load(sys.stdin)["personal"]["path"]')
EXPORT_ROOT="$DROPBOX_ROOT/Photos/Albums"
LOGFILE="$EXPORT_ROOT/lightroom-export.log"

for FILE in "$@"
do
    DATEPART=`expr "$FILE" : '.*\(20[0-9][0-9]\).* -'`
    ALBUMPART=`expr "$FILE" : '.*\-.\(.*\)-.*'`
    FILEPART=`expr "$FILE" : '.*-\(.*\)'`

    DATETIME=$(date "+%Y/%m/%d %T")
    EXPORT_FOLDER="$EXPORT_ROOT/$DATEPART - $ALBUMPART";
    mkdir -p "$EXPORT_FOLDER"
    mv "$FILE" "$EXPORT_FOLDER/$FILEPART"
    echo "[$DATETIME] exported '$FILE' to '$EXPORT_FOLDER'" >> "$LOGFILE"
done
I had to do this moving using a post-processing script because it’s impossible in Lightroom to publish files to dynamically named folders.
Share albums with friends and family
Now that each edited photo in a album is published to his own dedicated folder it’s super easy in Dropbox to share this album with other people. Thanks to the native share functionality of Dropbox it’s just a matter of right clicking on the album you want to share, and inviting them to the folder.
Next time a friend asks to send him the photos of the 2014 New Years eve party I can send them a link in just a few seconds instead of going through the cumbersome task of compressing, uploading and emailing them the photos.
Let alone the fact that I maybe added some new photos to that album, and I have to do the same process over again. With a Dropbox shared folder you don’t have this problem because you give people access to that actual album folder. So new photos will be automatically visible for them to.
Publish photos from multiple devices
Another cool feature that we use a lot is that you can give other people write access to a folder. This way you can make a shared vacation photo folder if you are on vacation with other people. We personally use this so that I and my girlfriend can publish photos of our son in one folder that we then can share with our Family.
Automate album updates
If you want to automatically notify people about new pictures in an album you can also configure a IFTTT recipe that will send out an email when you upload a new picture.
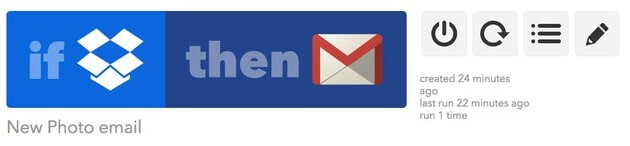
Do make sure to checkout other recipes on IFTTT because you can do some seriously cool stuff with this service, and best of all: it’s free!
Multi computer Lightroom
I also store my Lightroom catalog on Dropbox. This makes it possible to use the same Lightroom catalog on multiple computers. Especially because all my images are also on Dropbox, this is very easy to setup.
That’s it, for now
Every photographer has it’s own workflow and preferences so this workflow is maybe not what you are looking for, but I hope some of you can reuse some of the ideas or practices that I described above.
The workflow is still pretty new for me so chances are that this workflow will evolve over the next couple of months and years to come. If you have any suggestions, please don’t hesitate to comment below.
Tip Jar
If you like this blog, leave a tip! Your tip will help provide the basic necessities which sustain this blog: coffee, beer and raincoats for surviving the pitiful Belgium climate.
Buy me a coffeeAbout Wim Mostmans
Freelance full stack developer and Co-founder of the Employee Advocacy platform Ambassify, with a general interest for web technologies, electronics, AI projects, and home automation.
![]()
![]()
![]()
![]()
![]()